Post by Scrit on Dec 3, 2007 23:15:05 GMT
The Mods have been talking about trying to publish a few "How-To's" which cover a bit of ground and perhaps introduce something a bit more exotic by way of equipment and/or techniques. Anyhow, looks like I got myself pushed into the spotlight to be first up.........
Having taken on a job which would require several dozen scribed corners to be done I found myself looking for ways to speed up the process. In my opinion mitres don't work as they become really obvious if they do open over time - and in any centrally-heated building natural wood mouldings will open - so it was back to scribed joints (or coped joints as our 'Murrican cousins call them). Personally I hate using coping saws. They're slow, I find them difficult to control in thick hardwoods and they break so easily, so I decided instead to find a mechanical way to do the job without breaking the bank. Of course that meant those fancy £1500 machines sold in America were out of the question. I needed something which would work like a mechanised scroll or coping saw. The answer turned out to be a Collins Coping
Foot - and one very old jigsaw.
The principle of the coping foot is very simple, namely remove the old flat foot and replace it by a new foot which will allow point contact and point pivoting - rather in the way a curved kitchen knife can be rolled and pivoted on a chopping
board. This neat little gizmo does require another thing - the Bosch T244D jigsaw blade, a blade specifically designed for rapid sawing of curves. The blades are really coarse, but therein lies the secret - they can be used to "carve" or nibble away at material and in addition their coarseness matters little as the jigsaw is actually introduced to the work from the underside of the moulding, thus the cutting action is towards the surface resulting in minimal tear-out.
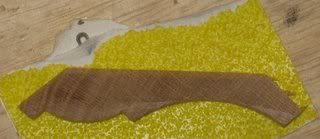
So how about a test run? Here we have an architrave which is being run inside a 6 x 4in architrave casing. The architrave profile is as shown below:
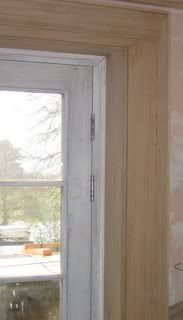
and I'm going to scribe the two legs of the architrave moulding after the top has been fixed in position as shown here:
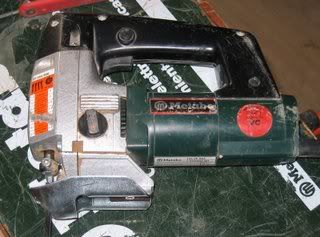
The first thing to do is fit the jigsaw with the coping foot and a Bosch T244D blade. I used my trusty old (and I mean old) Metabo Step jigsaw. It's had a hard life, but seems bulletproof, despite the "battle scars":

The standard flat base is removed and the coping foot substituted:
The foot will fit many trade/industrial jigsaws by firms such as Bosch, AEG/Atlas-Copco/Milwaukee, Metabo, Mafell, deWalt, Makita, etc. but the saw does need to be able to take the bayonet-type saw blades as used by Bosch industrial jigsaws.
A simple MDF jig is made-up to hold the moulding whilst it is being scribed:

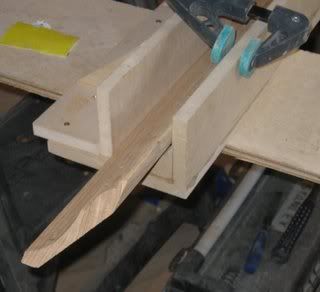
The leg to be fitted is first cut slightly over length and mitred on the chop saw. This one isn't too large so it is possible to hold the work in the same orientation it will finally be placed in and make the cut, although a support jig does make life easier if you are working with long pieces. If you are attempting to make a cut like this on a smaller saw it may be necessary to make the cut flat with the machine set to a compound angle, i.e. a bevel and mitre angle set together. I will follow up how to do this at a later date. Having mitred the end of the piece the scribe is then started. Firstly the piece is firmly cramped into the jig:
Then the waste material is sawn away to provide relief behind the mitred edge. Note the way in which the jigsaw is held and the positioning of the left hand out of harms way:
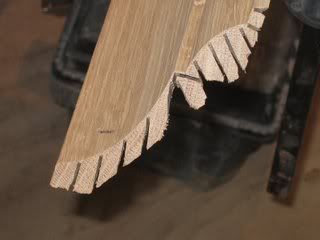
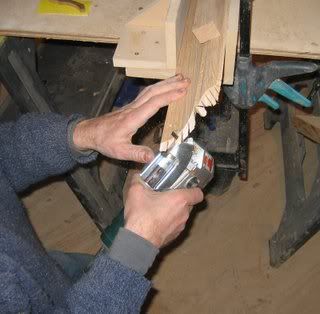
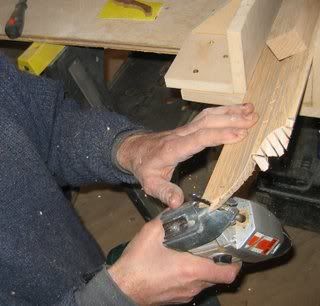

This is the hand hold used:
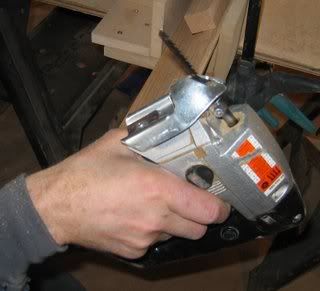
The jigsaw is set to orbit position 0 or 1 and the power locked on. Most of the time I run the machine at full speed. Here is the end result:
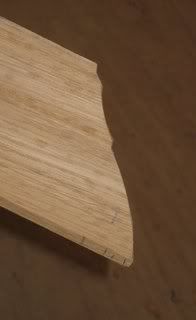

As you can see the joint is quite rough on the underside. This doesn't matter as it won't be seen. Thick edges are pared away using a selection of Microplanes, a sort of stainless steel cheese grater for wood, which leave a better surface finish and are less likely to break-out than a rasp. Any final trimming will
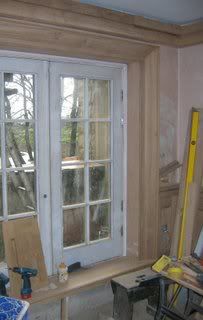
be done with a wood file. The mitred ends on square sections are pared back and the legs trimmed to length and offered up. Some final adjustment may be required, but here's the finished joint:

If you have any queries, please post. I'll be happy to help if I can.
I'll put together something about working odd angles and the use of tables, calculations and another new toy of mine, a Bosch angle finder shortly.
The Collins Coping Foot is available from Collins Tool Co in the USA. It actually costs more to ship than it does to buy, but if there is enough interest it might be possible to import a batch to save costs. If you'd like to see it in use a video clip, take a look here
Scrit
Having taken on a job which would require several dozen scribed corners to be done I found myself looking for ways to speed up the process. In my opinion mitres don't work as they become really obvious if they do open over time - and in any centrally-heated building natural wood mouldings will open - so it was back to scribed joints (or coped joints as our 'Murrican cousins call them). Personally I hate using coping saws. They're slow, I find them difficult to control in thick hardwoods and they break so easily, so I decided instead to find a mechanical way to do the job without breaking the bank. Of course that meant those fancy £1500 machines sold in America were out of the question. I needed something which would work like a mechanised scroll or coping saw. The answer turned out to be a Collins Coping
Foot - and one very old jigsaw.
The principle of the coping foot is very simple, namely remove the old flat foot and replace it by a new foot which will allow point contact and point pivoting - rather in the way a curved kitchen knife can be rolled and pivoted on a chopping
board. This neat little gizmo does require another thing - the Bosch T244D jigsaw blade, a blade specifically designed for rapid sawing of curves. The blades are really coarse, but therein lies the secret - they can be used to "carve" or nibble away at material and in addition their coarseness matters little as the jigsaw is actually introduced to the work from the underside of the moulding, thus the cutting action is towards the surface resulting in minimal tear-out.
So how about a test run? Here we have an architrave which is being run inside a 6 x 4in architrave casing. The architrave profile is as shown below:

and I'm going to scribe the two legs of the architrave moulding after the top has been fixed in position as shown here:

The first thing to do is fit the jigsaw with the coping foot and a Bosch T244D blade. I used my trusty old (and I mean old) Metabo Step jigsaw. It's had a hard life, but seems bulletproof, despite the "battle scars":

The standard flat base is removed and the coping foot substituted:

The foot will fit many trade/industrial jigsaws by firms such as Bosch, AEG/Atlas-Copco/Milwaukee, Metabo, Mafell, deWalt, Makita, etc. but the saw does need to be able to take the bayonet-type saw blades as used by Bosch industrial jigsaws.
A simple MDF jig is made-up to hold the moulding whilst it is being scribed:

The leg to be fitted is first cut slightly over length and mitred on the chop saw. This one isn't too large so it is possible to hold the work in the same orientation it will finally be placed in and make the cut, although a support jig does make life easier if you are working with long pieces. If you are attempting to make a cut like this on a smaller saw it may be necessary to make the cut flat with the machine set to a compound angle, i.e. a bevel and mitre angle set together. I will follow up how to do this at a later date. Having mitred the end of the piece the scribe is then started. Firstly the piece is firmly cramped into the jig:

Then the waste material is sawn away to provide relief behind the mitred edge. Note the way in which the jigsaw is held and the positioning of the left hand out of harms way:


This is the hand hold used:

The jigsaw is set to orbit position 0 or 1 and the power locked on. Most of the time I run the machine at full speed. Here is the end result:


As you can see the joint is quite rough on the underside. This doesn't matter as it won't be seen. Thick edges are pared away using a selection of Microplanes, a sort of stainless steel cheese grater for wood, which leave a better surface finish and are less likely to break-out than a rasp. Any final trimming will
be done with a wood file. The mitred ends on square sections are pared back and the legs trimmed to length and offered up. Some final adjustment may be required, but here's the finished joint:


If you have any queries, please post. I'll be happy to help if I can.
I'll put together something about working odd angles and the use of tables, calculations and another new toy of mine, a Bosch angle finder shortly.
The Collins Coping Foot is available from Collins Tool Co in the USA. It actually costs more to ship than it does to buy, but if there is enough interest it might be possible to import a batch to save costs. If you'd like to see it in use a video clip, take a look here
Scrit


