|
|
Post by darrenw on Jan 14, 2008 14:38:00 GMT
Hi All, Time for me, yet again, to mine that vast knowledge of yours  I am considering building some built in wardrobes. I thought about buying in the carcasses and adjusting for my requirements (sloping ceiling and also a need to fit them around the hot water tank and boiler), but thought that it might be reasonable to have a go at it all from scratch. Core MaterialPlan is to use real wood veneered MDF. Are there any other substrates? I can't seem to find anything other than MDF as the core, unless you get into the purpose made stuff where you can pick the substrate (eg SPA Laminates), but I imagine thats not a cheap option. Face GradesLooking at SL hardwords they spec their boards as having an A face and a B face, where i think the A face is the good one and B face is not so good. Is the B face much worse than the A face? CuttingI don't have a table saw, just a hand held circular saw. Is it feasible to cut these sheets with a hand held circular saw? Especially with regard to splintering/chipping the veneer. Are there any techniques which will help reduce these problems? What sort of blade should I be using (tpi, blade type, etc)? EdgingWhat is the iron-on real wood veneer tape like? Is it easy to use? Does it look ok, or abit 'DIY'? As usual any comments/suggestions/advice will be very welcome. Sorry for the hugh list of questions  Cheers Darren |
|
|
|
Post by dom on Jan 14, 2008 17:43:03 GMT
Hi Darren.
The veneered boards of MDF are fine and what much of the trade uses.
Use a straight edge for cutting the boards, make sure you allow for the thickness of the blade as well as the offset when setting your straight edge.
In my opinion a negative hook blade of about 6 degrees with as many teeth per inch as you can get is ideal.
Yes the A side is better than the B and will finish better, but other than that there is little difference, there may be a less interesting grain, especially in Walnut.
Iron on edging is fine.It's usually sold 3 or 4 mm wider than the board you are buying and you will need to trim it carefully with a Sharp chisel or Stanley knife, practice your technique first on some scrap.
After trimming sand with fine sandpaper ensuring all glue has been removed, or it will show up when you varnish.
Dom
|
|
|
|
Post by colincott on Jan 14, 2008 18:08:54 GMT
Hi Darren For a start you can use your circular saw for the job but you will have to make a saw board with a bit added to the saw, you should be ok. The EZ rail system is great at this sort of thing but I would guess you are not looking to buy anything now  The other thing you can do ( what I used to do ) is to cut you lines first and then cut with the saw. I will try to post a pic of the jig I used to use, its great for cross cutting.  |
|
|
|
Post by stevem on Jan 14, 2008 18:26:03 GMT
Darren
Cutting MDF with a CC is fine but best if you make a track to guide it (assuming you don't want to go down the EZ / Festool / new DeWalt
route).
I have a knock-down cutting frame, just a couple of 7" 2x2's and half a dozen 4" cross rails, mortised into them. I cut through the board and into the frame, so it's sacrificial, but it's lasted me donkeys years and is good for many more still.
The biggest risk when using a home-made guide is when cutting across the grain though. The pro versions have zero-clearance inserts, but you will probably get by fine by using masking tape to support the fibres around the cut.
One of the problems is cutting multiple panels to exactly the same width. I use a setting gauge to locate the CC track and that way they are all absolutely parallel and absolutely identical, and it's a lot safer than trying to pass an 8x4 sheet over a tablesaw on your own.
Cheers
Steve
|
|
|
|
Post by jasonb on Jan 14, 2008 18:50:10 GMT
The other board to consider if a wood grain MFC (Melamine faced chipboard) About the same to cut, you can get matching edging and no finish is needed. This is what off the shelf carcases will be made from and is much better quality than "Conti board" Have a look at Richard Russel, This is the type of [/url=http://smg.photobucket.com/albums/v156/jasonballamy/Fitted%20Furniture/]finish [/url]you can expect, the ones called "bill" and "Marie-ange" have the beech MFC carcases. Jason |
|
|
|
Post by paulchapman on Jan 14, 2008 18:55:07 GMT
Darren, Another option if you have a decent half-inch router is to cut them roughly to size and use the router to do the final cuts. It will take you a bit longer but will leave a nice finish. Cheers  Paul |
|
|
|
Post by Keith on Jan 14, 2008 18:55:47 GMT
Dom's right! A negative rake blade will give you the best results, but you need to be extremely careful using this sort of blade in a table saw and even more so in a circular saw. The negative cutting angle tends to lift the board/ push the board away from the blade and can cause kick back.
A safer method would be to cut the board a couple of mm oversize with a fine cut blade and then, if you needed to, trim with a router running up against a straight edge.
Keith
Edit Paul you beat me to it ;D
|
|
|
|
Post by engineerone on Jan 14, 2008 18:57:05 GMT
to add to the depth of knowledge, i would suggest that you make proper cabinets that have a back in them to ensure that they are both stable, and more importantly allow you to ensure that things don't drop down the back. if you make them in sections, they are easier to handle on your own, cause mdf is bbbbbbheavy  i would not make them in situ in your own situation because of the need to fit things round. in the first instance make the cover for the water tank and boiler stuff, that will give you a better idea of how easy it is to do, and also what space you have left. remember that clothes vary in length, so make allowances for the different types ie shirts, trousers, coats etc. also you may well want to make drawers for many different items since it makes them easier to handle. it is worth checking out say mfi and ikea to see the latest ideas on holding stuff in wardrobes. as for the veneered boards, they are a sensible answer to this question, put the good face on the inside unless you are going to only cover part of the wall. that way you will have a decent looking internal. remember to allow for lighting if you want it. as for the veneer, it is very good, there are actually proper cutters from i think it is virutex to make it easier. cut the wood to size first, make your joints, and this is a good place for biscuits. do you have enought clamps, or have you thought about screws, if you going all across the wall. once the unit fits together dry, then add the veneer. it is actually worth adding it to the back so you can more easily coat that with varnish or dye, to ensure waterproofing. the other thing is not to have your shelves much wider than 16-18 inches 400-450 mm to reduce the chance of bending. use 18mm it is plenty strong enough for the uprights, and 12mm for the back. so as not to waste money as said earlier start with the water cupboard, that way you will find out what is happening and whether you are brave enough to go all the way. ;D very good luck. paul  |
|
|
|
Post by paulchapman on Jan 14, 2008 19:10:56 GMT
If you do use a router, make or buy a nice large sub-base for it like this 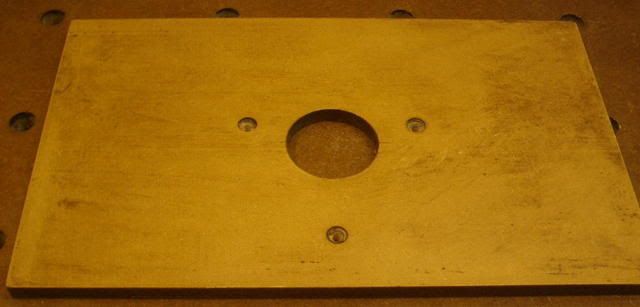 or this  as it makes a nice bearing against your straight edge and ensures that the router is firmly in contact with the straight edge before the cutter touches the work 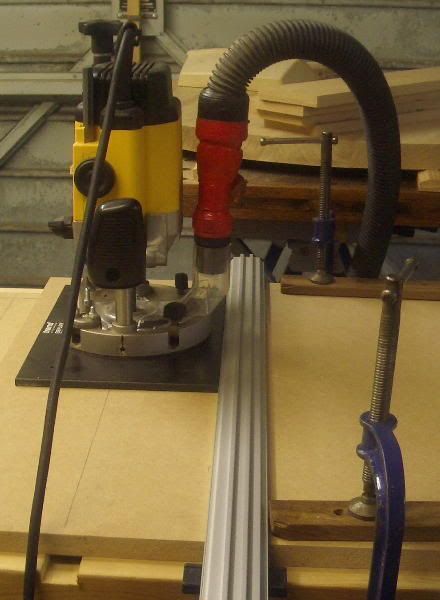 I made a similar one for my hand-held circular saw - makes a big difference to the stability and accuracy of the cut. Cheers  Paul |
|
|
|
Post by darrenw on Jan 14, 2008 20:10:39 GMT
Great advise as usual! Thanks Guys. To give a straight edge I was going to use a large track of MDF I cut off a 8ft board sometime ago. The edge should be straight enough for what I need. Nice idea about the router base though.... and possibly making one for the CC, are there any saftely hazards with the base on the CC? I assume you don't remove the blade guard! Some people have suggested a sacrificial board to cut through underneath, I assume this is to reducing chipping of the veneer. How deep should the blade be. Seen different things. Normally with the CC I cut only slightly overdepth. However I have read somewhere that for veneered board it is best to extend the blade further out, which is supposed to mean that the teeth hit at about 90deg which is supposed to reduce chipping. Any thoughts? Also considered using the router or using a knife to score the veneer before the cut. Would prefer to do just one cut but will depend on the quality I suppose. The cupboards are going wall-to-wall and I was going to built them as smaller carcasses and slot them next to each other. Do you slide the backs in to a rebate/slot or just pin/screw then to the backs? I was planning on using screw to join everything together which I think may be easier then biscuits (?). You won't see the sides of the carcasses so that doesn't matter. Also its between two walls so the structure shouldn't be moving too much  I think I have seen before that you use an edging board at each end to meet the walls which undoubtedly won't be straight. So its not a completely stupid thing to attempt. I suppose with some experimentation it should work out OK. Thanks again for you advise Cheers Darren |
|
|
|
Post by paulchapman on Jan 14, 2008 20:21:16 GMT
are there any saftely hazards with the base on the CC? I assume you don't remove the blade guard! No, there shouldn't be any problems. I'll do you a photo of mine tomorrow. I made mine from MDF. Cut a slot in it large enough for the blade, riving knife and blade guard to pass through. Drilled through the MDF and base of the saw and fitted it with c/s head machine screws and nuts. You need to make sure that the sides are parallel with the blade. In my experience, most bases of hand-held saws are not very good - often they are just pressed out of some very thin metal and the sides are not always that straight. The main problem, though, is that they are too small so don't give a very good bearing on the straight edge, so the saw can twist a bit as you start and end the cut, which is a bit annoying  Cheers  Paul |
|
|
|
Post by dom on Jan 14, 2008 20:34:47 GMT
Yes, the deeper you can extend the blade the better, for exactly the reasons you stated.
The sacrificial board is so you don't cut through your bench/saw horse/concrete floor.
Keith is of course right you have to be very careful with a negative hook blade.
Unless it is a plunge saw with a retractable riving knife.
|
|
|
|
Post by darrenw on Jan 14, 2008 20:45:32 GMT
Thanks again.
Will be interested to see the picture Paul!
Cheers
Darren
|
|
|
|
Post by engineerone on Jan 14, 2008 20:50:46 GMT
personally i screw or pin the backs on, and if you check the made ones, they tend to be in a rebate and then pinned. the important thing is of course to keep the item square as it is made and installed. thing about biscuits is they give you positive location whilst screwing or other fixings like gluing. if you screw make sure to drill proper pilot and fixing holes to match your screws, and use something like spax or reisser screws for security. as i suggested to dom elsewhere might be worth building a base as a kicker board to ensure the bottoms are all flat and level. good luck paul  |
|
|
|
Post by mailee on Jan 14, 2008 21:08:34 GMT
It is easy enough to make yourself a circular saw guide like this.  All I do is score along the cutting line then follow it up with the CC. HTH.  |
|
|
|
Post by Dave S on Jan 14, 2008 23:49:51 GMT
Hi Darren, I made some built in wardrobes last year, and relied heavily on the advice of many who have already replied in this thread. I used MFC for mine (a decent one, either Egger or Kronsospan, I can't remember which). I've found it easier to get a decent edge on veneered material than on MFC, but then the veneered stuff needs to be finished. I used a sawboard just like in Mailee's picture to cut slightly over with the circular saw and then trimmed with the router. It was a complete pain, but it did the job. With only a 1/4" cheap router, it cost me 3 cutters, though. I assembled using carcass screws with a couple of dowels per joint for alignment purposes. Again it did the job, but I found the dowels to be a little fiddly. Having recently bought a biscuit jointer, I can see that it would have made the job much quicker and easier. I placed my carcasses on kitchen cabinet legs. Never again! Trying to reach underneath to adjust the rear ones to level the carcasses was very difficult. Next time I'll build a plinth and sit them on top. Lessons learnt? Well I persevered with a clapped out old Black and Decker circular saw and a budget 1/4" router  and that was a big mistake. Since then I've upgraded the saw and bought the same guide rail as Colin mentioned but I really would have saved myself a lot of agro if I'd done that first. Good luck! cheers Dave |
|
|
|
Post by jaco on Jan 15, 2008 4:30:42 GMT
Face GradesLooking at SL hardwords they spec their boards as having an A face and a B face, where i think the A face is the good one and B face is not so good. Is the B face much worse than the A face? When i order veneer for this one factory, we will typically get what is called a mixed crate. It will have Faces "A" & Backs "B". The ratio could be 500 Faces & 90 backs. They press 9' x 6' sheets. We can also order crates of faces only, higher cost. The Face is where the leaves have been book-matched giving a good visual appearance. This will be the "Face" side of the panel that will be seen. The Back, or mismatch, usually where the leaves change from bundle to bundle, will be the "inside" of the door or project. The visual appearance is not that good, but only when looking at the total sheet. They could also have done some patching in the sheet or there could be a lot of sap showing. Where you start cutting the 9x6 for shelves or doors the difference between the face and back seems not to make a huge difference. Where you start paneling walls etc. then you certainly want very good matching faces. You can also get/use commercial Backs. These would be used on say a Kiaat face with a Sapele back. The Kiaat being the display side of what you are building. Cheers Phil (A very deep mine of useless information ;D) |
|
|
|
Post by darrenw on Jan 15, 2008 10:18:40 GMT
Mailiee: Good stats! I like the idea of that track. With carefull setup it should be possible to score, cut and route with the same fence (especially if the bases ares used on the CC and router). I was thinking that I may have to reset the fence for each task! Excellent Dave S: I can definately see the benefits of a plinth to create a nice level surface. Will definately look into this. Jaco Wrote: The Back, or mismatch, usually where the leaves change from bundle to bundle, will be the "inside" of the door or project. The visual appearance is not that good, but only when looking at the total sheet. They could also have done some patching in the sheet or there could be a lot of sap showing. So does this mean when cutting out the doors I may have a bit more wastage to get a door to have a good front and back. Don't want it to look bad when the doors are open. This wan't be a problem for the caracasses though, B side will always be hidden. Or is there another supplier which has better quality boards? Thanks again Darren |
|
|
|
Post by jaco on Jan 15, 2008 11:06:25 GMT
Darren, i would inspect and select board by board.
"Generaly" the B side should be acceptable when a door is open.
See what the cost difference is between and A-A and an A-B panel.
|
|
|
|
Post by Dave S on Jan 15, 2008 13:09:17 GMT
Mailiee: Good stats! I like the idea of that track. With carefull setup it should be possible to score, cut and route with the same fence (especially if the bases ares used on the CC and router). I was thinking that I may have to reset the fence for each task! Excellent That was my big mistake. If you look at Mailee's jig, it is double-sided. On mine, one side was for the saw and the other for the router. I had to set the jig twice for each cut. BY use of a base as Paul described, I could have set up the saw with just a couple of mm greater offset than the router, and then only needed to set up the jig once. Wish it had been that obvious at the time!  Dave |
|
|
|
Post by paulchapman on Jan 15, 2008 13:25:20 GMT
Darren, here are some pictures of my saw with the larger MDF base fitted 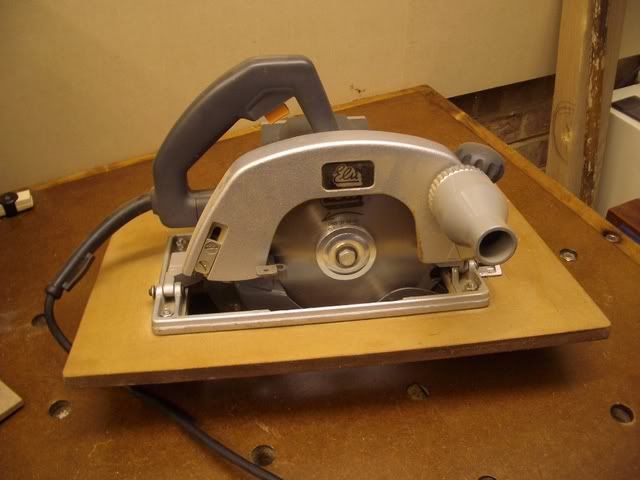  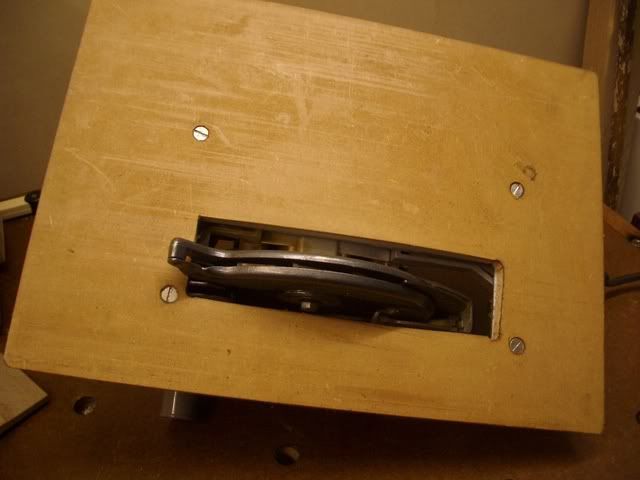 Quite simple really. Cut the MDF roughly to size with a hole for the blade and guard the same size as the existing hole. Fit the base then measure from the blade to get the sides exactly parallel with the blade, remove the base and cut to finished size. I keep the base waxed to protect it from moisture and make it slide easily. It's a big improvement over the original saw base. Personally, when cutting veneered boards I now tend to use my router because it gives a better finish. It's about the action of the cutter/blade. With a router, the cut is side to side whereas with a saw its bottom to top. As a result, the saw will tend to chip the surface whereas the router won't. But it depends on the tools you have. With a saw a really good blade, with the right tooth formation is important. I have a tripple chip blade which is good for veneered boards. But its ability to provide a chip-free cut, or indeed to cut in a straight line, depends on it being sharp. As it blunts the cutting performance will obviously diminish. Using a router will take longer as you need to cut in small steps but the guarantee of a better finish is higher and you don't need to score the surface. As always, plenty of choices and options  Cheers  Paul |
|
|
|
Post by mailee on Jan 15, 2008 14:06:42 GMT
Yes Dave, like you I have one side for the CC and the other for the router. As you say it was an oversight and I could have used one side for both making it much better. Next time I will know.  |
|