|
|
Post by 9fingers on Oct 28, 2007 19:44:42 GMT
The next project on the list is an infeed/outfeed table for my el-cheapo Screwfix mitresaw. With a little care, it does a resonable job and I can't justify replacing yet. I'm fed up with balancing timber on little piles of offcuts to take the weight whilst I concentrate on the cut. The design is an unashamed knock-off of the Norm design but scaled down. The infeed is 1.2 m and outfeedside is 600mm. It is cunningly positioned so that longer outfeed stock just misses the RAS. It is made from 'Rebound' board. 12mm baltic birch ply with phenolic resin coating. This stuff is great for tables, jigs and anything where easy sliding is needed. You should be able to get it from most trade sheet timber stockists. I needed a whole lot for a job a while back and I've got some leftover. I've tarted it up a bit by lipping some of the edges with some scraps of dougy fir. not the best stuff for lipping but it was handy. By the way I hope readers wont be offended by the picture of the missus on the wall ( it was taken a few years back!!)  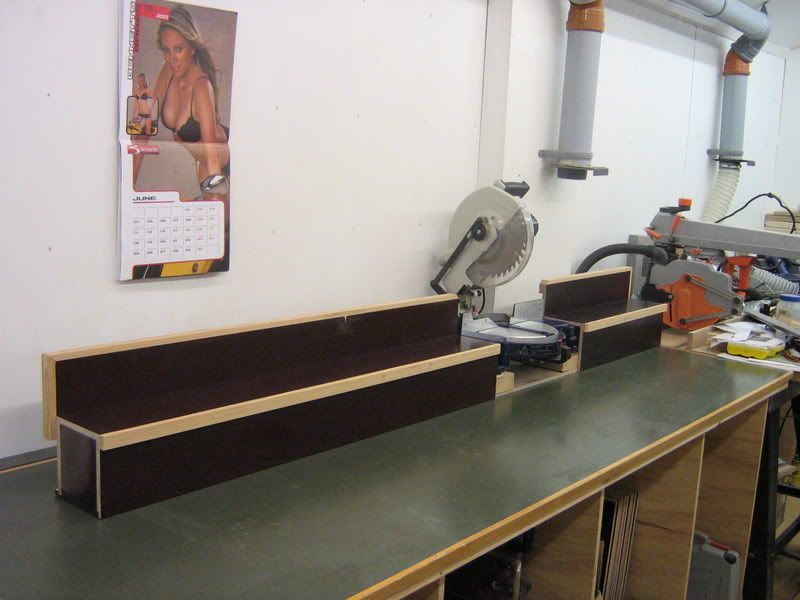 This is work in progress so the saw is yet to be mounted properly and is shown just balancing on some offcuts. 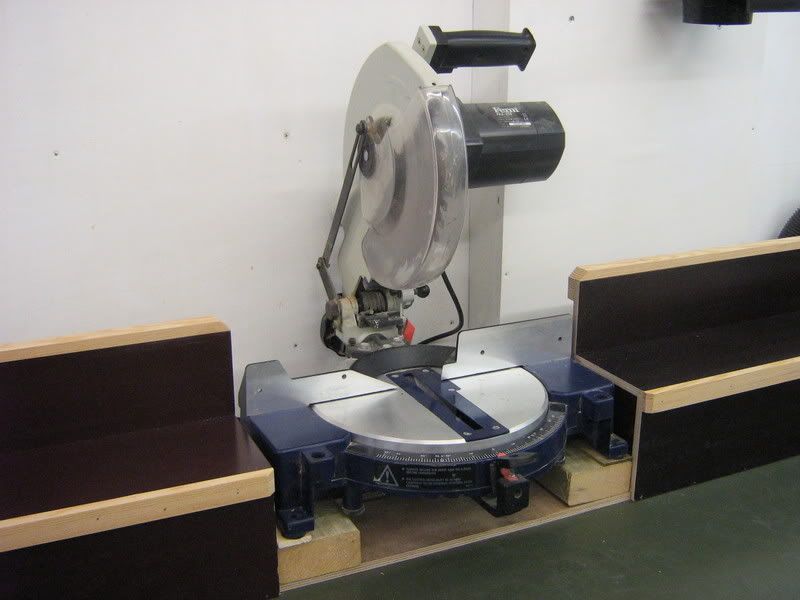 I'm planning to mount the saw through some eccentric bushes with woodscrews. I'll use the screw to compress the rubber feet to bring the levels spot on and rotate the eccentrics to bring the fences into line. That will be a job for the metalworking shop during the week and then I can finish off next weekend with luck. Bob |
|
|
|
Post by jfc on Oct 31, 2007 17:53:36 GMT
Quick question on the extraction piping if i may , does the plastic pipe not cause static to build up ?
|
|
|
|
Post by Scrit on Oct 31, 2007 18:25:46 GMT
Quick question on the extraction piping if i may , does the plastic pipe not cause static to build up ? They may cause some static, but the amount is trivial and recent research has shown that in small installations the effect is minimal. Fopr further information might I suggest reading the paper by Dr. Rod Cole as well as the appropriate section of Bill Pentz's excellent dust collection website? Scrit |
|
|
|
Post by Scrit on Oct 31, 2007 18:36:01 GMT
Hi Bob Excellent idea and certainly a "must have" for any chop saw. I'm planning to mount the saw through some eccentric bushes with woodscrews. I'll use the screw to compress the rubber feet to bring the levels spot on and rotate the eccentrics to bring the fences into line. Good idea. For my own use I'd need a QR fastener as my saw spends part of its' life out on site. The only comments I'd make are that I think you should consider ways to add flip-over stops as these speed-up multiple identical cuts no end as well as improving length accuracy. I'd also consider adding something to hold cornice-type mouldings upright (i.e. in the installation "position") for sawing as this is more accurate than flat sawing using the 31.6° mitre / 33.9° bevel method (which in any case you're unlikely to have detents for on a lower-cost saw). Finally have you thought about provision for holding work down during the sawing? The solid front of your supports might make that a tad difficult. Regards Scrit |
|
|
|
Post by 9fingers on Oct 31, 2007 18:41:06 GMT
Quick question on the extraction piping if i may , does the plastic pipe not cause static to build up ? Nothing noted yet JFC. Most of the dust sources connected so far are the jet jointer at the first branch so only about 4' of UPVC. The P/T currently gets connected to the same port and the TS is permanently plumbed into the second port - about 8' run of UPVC. The third and fourth ports are the ones you can see in the pictures and these have not done much work yet. There are another 4 ports on the other side of the shop- again yet to be used in anger. Most of the set up is jury rigged for now as I gradually build benches, a router table and some sort of roll around stand for the P/T. There might be more of a problem on the longer runs. It would be easy to fit a an earth conductor inside the pipe at a later stage. Bob |
|
niki
New Member

Posts: 38
|
Post by niki on Oct 31, 2007 19:21:55 GMT
Hi Bob Even though I don't have a chop saw...or the beautiful RAS on the right...it's beautifully made station. Oh, I hope that your shop is heated at the winter because...she does not look properly dressed for the cold days....  niki |
|
|
|
Post by 9fingers on Oct 31, 2007 21:06:41 GMT
Hi Bob Excellent idea and certainly a "must have" for any chop saw. I'm planning to mount the saw through some eccentric bushes with woodscrews. I'll use the screw to compress the rubber feet to bring the levels spot on and rotate the eccentrics to bring the fences into line. Good idea. For my own use I'd need a QR fastener as my saw spends part of its' life out on site. The only comments I'd make are that I think you should consider ways to add flip-over stops as these speed-up multiple identical cuts no end as well as improving length accuracy. I'd also consider adding something to hold cornice-type mouldings upright (i.e. in the installation "position") for sawing as this is more accurate than flat sawing using the 31.6° mitre / 33.9° bevel method (which in any case you're unlikely to have detents for on a lower-cost saw). Finally have you thought about provision for holding work down during the sawing? The solid front of your supports might make that a tad difficult. Regards Scrit Thanks for your comments. I do plan to add some sort of stop. Somewhere I've seen a reverse measuring scale going from right to left to stick on top of the lipping on the infeed side. I did give some thought to work holddowns and crown moulding support. I expect I will simply screw some blocks on a case by case basis. In the longer term I will possibly get a SCMS and by then I'll have discovered the various shortcomings of this design and make another to an enhanced design. Bob |
|
|
|
Post by 9fingers on Oct 31, 2007 21:24:43 GMT
Hi Bob Even though I don't have a chop saw...or the beautiful RAS on the right...it's beautifully made station. Oh, I hope that your shop is heated at the winter because...she does not look properly dressed for the cold days....  niki Hi Niki, I put a lot of effort into insulation when I built the workshop. The walls are concrete blocks but lined with plywood on the inside with polystyrene foam behind it. The roof has 100mm fibreglass and more polystyrene under the wooden floor. I use a 500 watt oil filled radiator on a thermostat for background heating the volume of about 70 cubbic metres. This is plenty of heat for southern UK - we don't get too cold especially compared with Poland. My cast iron machines have their own low power heaters and this stops all rust as it is virtually impossible to get condensation forming. This technique is well proven in my metalworkshop where I have no heating and not a speck of rust on my lathe or mill over a 25 year period The RAS was an Ebay bargain and needs a bit of TLC. I've adapted it to take a dado set. Maybe I shouldn't have said that bit!! I've got it running on an inverter so I can control the speed and the rate of braking to reduce the chance of the blades undoing themselves. Bob |
|
|
|
Post by thatsnotafestool on Nov 1, 2007 6:51:01 GMT
|
|
|
|
Post by 9fingers on Nov 1, 2007 8:45:46 GMT
Thanks ROger,
shame the Rutlands postage price is almost the same as the item itself.
Maybe I'll just have to browse the catalogue some more and pass details to Father Christmas!
Bob
|
|
|
|
Post by 9fingers on Nov 4, 2007 15:20:00 GMT
I've now completed the mounting of the saw in a way that makes the position adjustable in three axes to align with the in and out feed tables. General picture of the saw in position 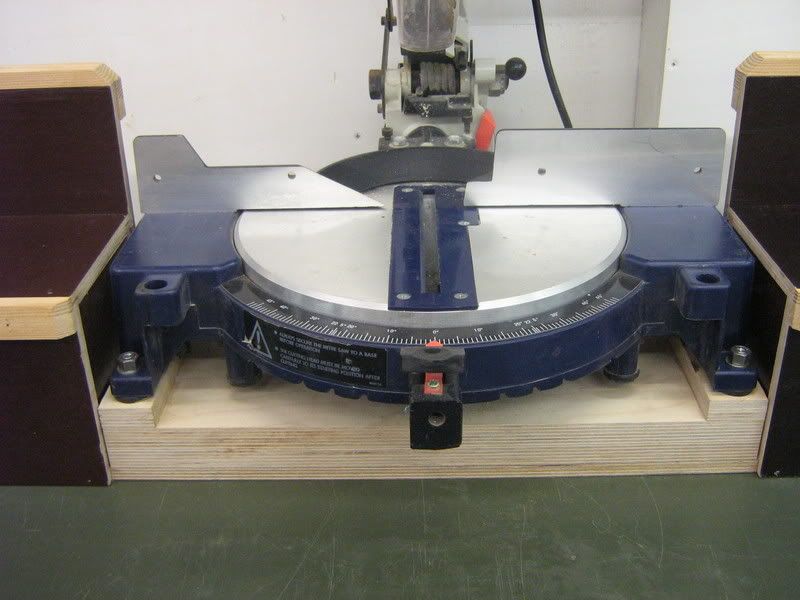 The adjustment bushes are made from 13mm a/f hexagon steel although almost anything that a spanner can hold will do. The general view side on 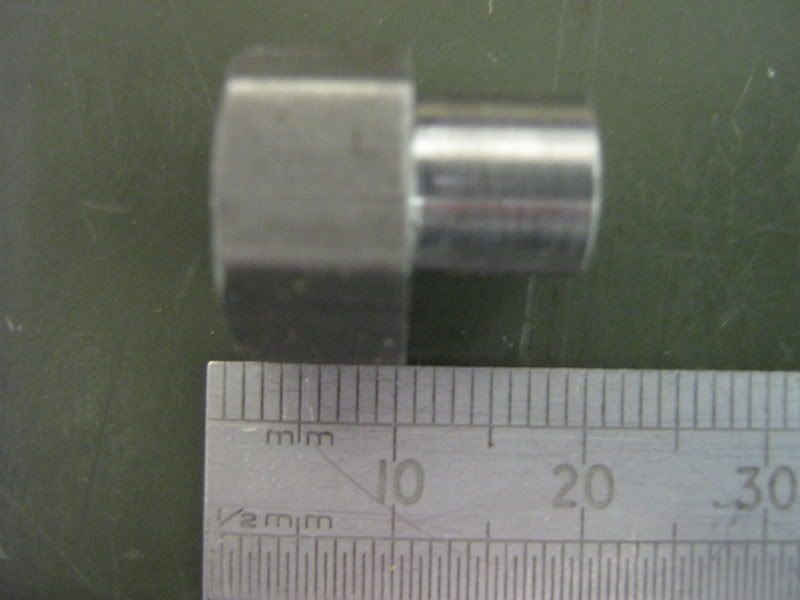 The adjustment in x and y axes is done with the eccentric boss on the underside of the bush. 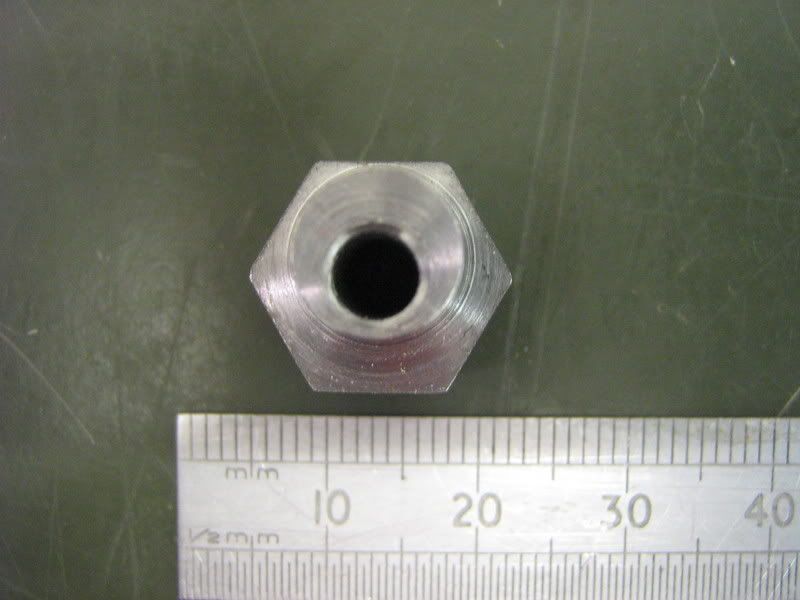 the hole is central to the hexagon and the boss is offset giving about 1.5mm total adjustment range. This photo show the countersunk hole to suit the hold-down screws. 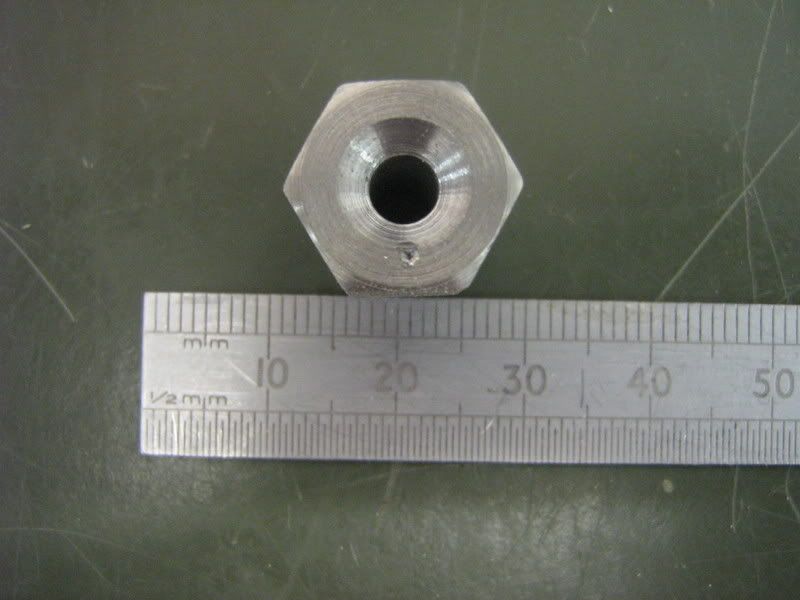 Note also the centre pop mark showing the position of maximum offset of the underside boss. My saw has four mounting points with rubber feet under each so I have 4 of these bushes. The saw is placed in the nominally correct position and the bushes fitted into the mounting holes each with the centre pop dot located at the 3 o'clock position. Although the adjusters will give combined X and Y movement I only need Y axis adjustment to align the back of the fence. each screw is fitted and lightly tightened. Here is one - the rest are similar 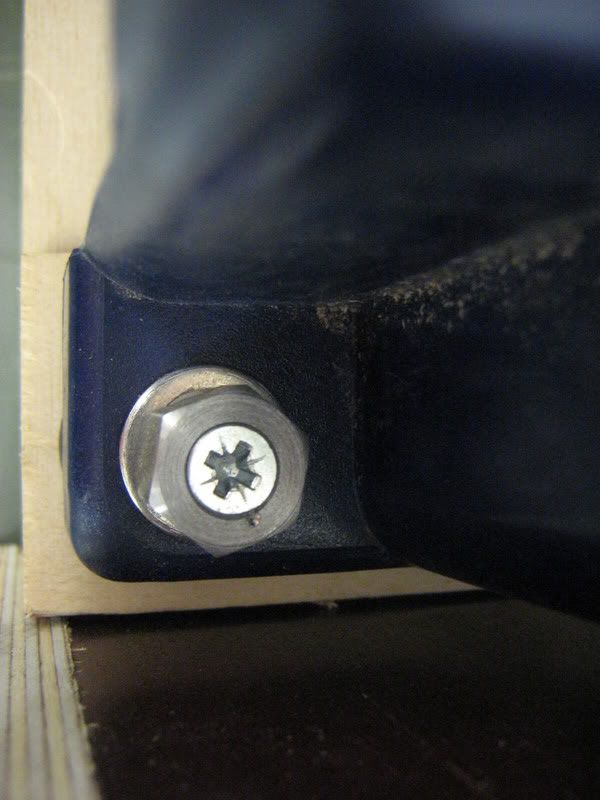 Each bush is turned with a spanner a little at a time until the fence uprights are in perfect alignment. Now to adjust the horizontal levels (Z axis). By sliding a straight edge over the tables and the saw base the screws can be tighted whilst holding the bushes with a spanner to stop rotation, until the straight edge will slide without catching from saw table to in/outfeed tables and vice versa. Once I get a suitable scale then I will sort out some form of stop mechanism to suit the tables. That's it for now folks! Bob |
|
|
|
Post by dantovey on Nov 5, 2007 14:34:23 GMT
I'd also consider adding something to hold cornice-type mouldings upright (i.e. in the installation "position") for sawing as this is more accurate than flat sawing using the 31.6° mitre / 33.9° bevel method (which in any case you're unlikely to have detents for on a lower-cost saw). Blimey Scrit, You've lost me there with the angles! I just cut my crown moudling upside down - it's dead easy. Dan |
|
|
|
Post by jaco on Nov 5, 2007 15:55:54 GMT
I have now read this thread umpteen times, and i still cannot find the Mitre Saw!!!!!!!!!!!!!
;D ;D ;D ;D ;D ;D ;D ;D
|
|
|
|
Post by 9fingers on Nov 5, 2007 16:15:36 GMT
I have now read this thread umpteen times, and i still cannot find the Mitre Saw!!!!!!!!!!!!! ;D ;D ;D ;D ;D ;D ;D ;D Hmm! That's a bit too subtle for me at the moment. Could it be you are getting distracted by the pin up in my first picture and not looking at the saw at all? Bob ;D ;D ;D |
|
|
|
Post by dantovey on Nov 6, 2007 11:28:13 GMT
With you, Senior.
I've never had to mitre crown mouldings taller than my mitre saw - I guess I'd just make myself a big mitre box and use a hand saw. Maths was never my strong point!
Dan
|
|
|
|
Post by engineerone on Nov 6, 2007 21:14:55 GMT
for cutting off your hands   paul  |
|
|
|
Post by Scrit on Nov 11, 2007 9:54:28 GMT
Blimey Scrit, You've lost me there with the angles! Then you need to learn a bit about geometry - and about how to use your saw. All the double bevel SCMS saws I've ever used, including my current Makita LS1013, have detents at 31.6° on the mitre scales (along with 45°, 22.5° and 0°) and some have detents at 33.9° on the bevel scale (as well as 45° and 0°) - although curiously the Mak only has a detent on the right bevel side....... These detents are there to accommodate 38/52 spring angle cornice moulding cut flat. RTFM and you'll see what I mean. I just cut my crown moudling upside down - it's dead easy. And what do you do with a moulding which is warped? Or one which is too high to fit under the blade? Even the DW718, the replacement for your DW708, can only accommodate 74 x 345mm stock square cut (making 8in 38/52 cornice impossible to cut abything other than flat). There is the additional problem that SCMS blades have a tendency to flex a bit in cut, especially on trimming or dust cuts. This is most noticeable on the 12in saws. That every SCMS on the market has some flex in the rails as well iintroduces more inaccuracy into the cut. Another factor is the length of material. Cutting flat makes it a tad easier to handle long lengths as the cut end can be clamped down flat onto the table of the SCMS. Maybe not much of a problem if you are schlepping a bit of 2-1/2in cornice on a kitchen cabinet, but this sort of issue can become a major headache when trying to install a 4 metre length of 8in high cornice moulding (and yes they do exist), so in some circumstances there is a need to cut the material flat, even on the largest of SCMS saws. With smaller saws using a calculated compound angle can be the ONLY way to actually cut cornice moulding as it won't fit any other way. Trying these sorts of cuts by hand can be an even more frustrating exercise as they are too large to trim on a mitre guillotine (at least not the sizes on the market these days) and few people possess a mitre block/mitre plane combination to attempt the clean-up in that way. I've seen 12in high architerctural mouldings cut this way, but they were paint finish and so could be filled with putty. Scrit |
|