|
|
Post by lemonjeff on Apr 3, 2008 12:54:07 GMT
First off I'd like to say hello to everybody, I'm not trade or hobby, most of the jobs on my list are going to be trade type for my own home mainly using MR-MDF & MFC. My first project is a fitted wardrobe with sliding doors. The width of the opening is 2300mm & 610mm deep with three doors, any recommendations for the best sliding gear? I want to do the doors in painted MR-MDF, rail and stile with raised panels, I was thinking 18mm for the rails and stiles and 12mm for the panels should I go thicker? what's the best construction, end panel/centre panel or carcass, I want to put a base/plinth rather than walk-in style so I've been thinking of going down the carcass route  Jeff |
|
|
|
Post by 9fingers on Apr 3, 2008 13:13:48 GMT
Welcome Jeff,
I'm sure you will get good advice here. I've not done wardrobes for years but the last one I did I noticed the doors could have been stiffer top to bottom and vibrated a bit. I'd be reluctant to make them from thicker MDF because of the weight but may lip the doors with hardwood to say 30mm as a stiffener or whatever you can fit in consistent with whatever the tracking gear requires.
As for the frame maybe a carcass with a panel as the end to match the door pattern?
Looks like the wardrobe will be on an inside wall? otherwise watch out for ventilation/condensation problems.
Good Luck and don't forget the WIP photos that we all enjoy!
Bob
|
|
|
|
Post by Dave S on Apr 3, 2008 14:41:36 GMT
Hi Jeff and welcome. I think you'll find some of your questions answered in these two threads. here and hereMy doors are full height and are 22mm frames with 12mm panels, but they are hinged. It may be that with sliding doors a 18mm frames are fine. Best wait for one of the pros to advise on that one. Dave  |
|
|
|
Post by Keith on Apr 3, 2008 17:06:49 GMT
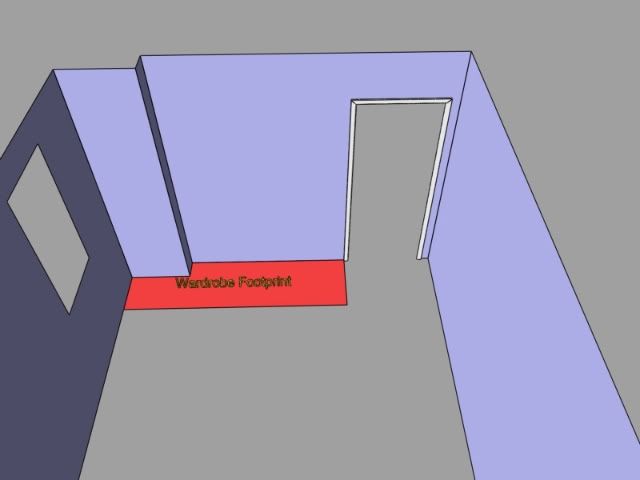
I haven't use sliding doors for years so can't be of much help with that, but looking at your drawing, the wardrobe comes right up to the door frame. Personally I would sacrifice a little storage space and set it back at least 100mm, more if possible. If you take it up to the architrave it will be very baulking as you walk in and out of the room.
|
|
|
|
Post by jonnyd on Apr 3, 2008 20:08:29 GMT
Hi I do a few sliding door wardrobes a year. I usually use a system called eku clipo 35 which I get from Hafele. www.hafele.com/uk/ you will have to enter the catalogue as a guest and then search for eku clipo if you haven't got an account with them. Jon |
|
|
|
Post by modernist on Apr 3, 2008 20:37:36 GMT
|
|
|
|
Post by lemonjeff on Apr 4, 2008 8:35:03 GMT
Thanks for the replies, lot of useful info.
Keith your right about the door, The existing robe goe up to the door frame and it's a pain in the ar$e with the door so close so I will be making that change.
Bob yes the robe goes up to an outside wall on the left and the existing one suffers from mould at that point and I don't know what to do about that.
Now you come to mention about stiffness I think there's a post on UKW about using studing to stiffen doors.
Brian nice job on the wardrobe, did you hide the runners in the end?
Jon I have a account with Hafele I'll have a look thanks.
Jeff.
|
|
|
|
Post by modernist on Apr 4, 2008 10:52:30 GMT
Thanks for the replies, lot of useful info. Brian nice job on the wardrobe, did you hide the runners in the end? Jeff. I decided I would but it's still on the list ;D |
|
|
|
Post by lemonjeff on Apr 11, 2008 13:21:17 GMT
What shoud i do about the carcass backs, slot into a routed groove like draw bottoms or just screw to the back of the carcass?
Shoud the carcass go againist the wall? if not how much gap?
Jeff
|
|
|
|
Post by ''The village idiot'' on Apr 11, 2008 13:54:50 GMT
Most sliding doors bend, belly, warp call it what you will so you can put a set of these on the rear of the doors and it will help prevent this from occurring. Page 4.026 By using this type of track fitting you won’t see the track when finished. Pages 76-80 The backs should be 6 or 9mmm thick board set in a grove in the top bottom and sides. If the back is cut square and true then it will pull the carcass square and true |
|
|
|
Post by lemonjeff on Apr 16, 2008 8:51:04 GMT
I've had a look round various forums about fixing the carcass's in place and come up blank, should i be fixing them to the wall, plinth & ceiling and how to hide the screws on the inside?
Jeff.
|
|
|
|
Post by ''The village idiot'' on Apr 16, 2008 11:26:54 GMT
Hi Jeff This may be of help and click on hook / split battens |
|
|
|
Post by lemonjeff on Apr 17, 2008 8:59:35 GMT
Hi Jeff This may be of help and click on hook / split battens How do I juggle the carcass hooking on the cleat properly and making sure the base is resting on the plinth? I can't visualise how they come togather at the same time Jeff. |
|
|
|
Post by ''The village idiot'' on Apr 17, 2008 12:41:47 GMT
Hi Jeff This may be of help and click on hook / split battens How do I juggle the carcass hooking on the cleat properly and making sure the base is resting on the plinth? I can't visualise how they come togather at the same time Jeff. You lift the carcass on to the cleat and they come together as shown in the drawing. The instructions should be on the drawing but just in case they are not see below; |
|
|
|
Post by cnc paul on Apr 17, 2008 17:36:14 GMT
I've had a look round various forums about fixing the carcass's in place and come up blank, should i be fixing them to the wall, plinth & ceiling and how to hide the screws on the inside? Jeff. Its a wardrobe that will be full of clothes, what's wrong with a screw and cup ? Paul |
|
|
|
Post by Dave S on Apr 17, 2008 19:28:21 GMT
You lift the carcass on to the cleat and they come together as shown in the drawing.  You and an army of apprentices, maybe!! Getting a full height carcase onto a plinth is hard enough. especially next to the end wall, let alone having to life it up off the plinth in order to hook it over the cleat. I've used French Cleats before for hanging wall cabinets, but quite why you'd want to use them here I don't understand, because the plinth will support the weight, and a couple of screws into the wall are plenty to stablise it.  On mine, I screwed a batten to the carcases, at the back and screwed through them into the wall. I was able to reach between the top of the carcase and the ceiling to do it and then the cornice goes on afterwards. However, I'm an amateur with just one built-in under my belt, so I'm open to education. Dave |
|
|
|
Post by jfc on Apr 17, 2008 21:30:16 GMT
Gotta agree with Dave here . You drop your units onto the plinth and level them and fix them together or relocate the screws if made in the workshop . Then once the whole unit is in place and level / where you want it only then do you fix it to the wall .
|
|
|
|
Post by sainty on Apr 17, 2008 22:19:54 GMT
What do you guys do about th carpet? Do you trim and it gripper etc or just pull it back and leave it for the home owner?
|
|
|
|
Post by Dave S on Apr 17, 2008 22:52:29 GMT
What do you guys do about th carpet? Do you trim and it gripper etc or just pull it back and leave it for the home owner? Threw it in the skip and laid a maple floor instead. ;D Dave |
|
|
|
Post by lemonjeff on Apr 18, 2008 10:23:08 GMT
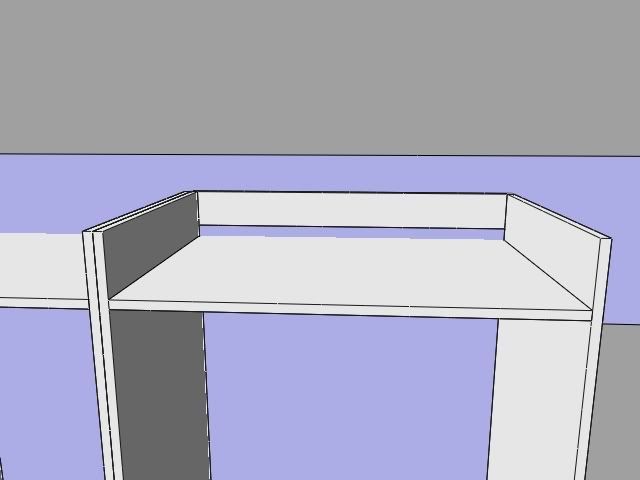
Dave, Is this how you did it?  Jeff. |
|
|
|
Post by Dave S on Apr 18, 2008 12:24:54 GMT
Dave, Is this how you did it? Jeff. If I say no, do I have to do a fancy sketchup picture to show how I did do it??  ;D Not quite. Something worth pointing out, (If someone hadn't pointed this out to me it would have caught me out), is that the carcase can't be as high as your ceiling if you want to assemble it on the floor and then swing it up into the vertical position. My sides were 18mm MFC and the sides finished flush with the top - it was simply a rectangular box. The back was 15mm MFC, rebated into the back of the carcass. I then screwed a piece of MFC into the back edge of the top, so that it extended above the top of the cabinet by about 50mm. I did this after the carcass was in the vertical position but before putting it into position. I then screwed through it into the wall using an oversized hole with screw and a washer. The carcase therefore sits with a gap of about 18mm between the back and the wall. So looking at your pic, if you move the batten downwards so that you can screw it into the back edge of the top, and then cut down the sides so they are flush with the top, you will have pretty much what I have. There are other ways to do it, I'm sure, but it worked. All that writing - it might have been quicker to learn how to sketchup!! ;D Hope it's clear. Dave |
|
|
|
Post by lemonjeff on Apr 18, 2008 19:23:49 GMT
Dave, I'm with you now  Your dead right a pictures worth a thousand words and a hell of a lot quicker, once you've learnt the software. I use Rhino3D I can't get my head round sketchup  . Thanks a lot mate. Jeff. |
|
|
|
Post by Dave S on Apr 18, 2008 19:45:56 GMT
That's exactly it. I use Rhino3D I can't get my head round sketchup  . Not heard of that one. I've had a look at sketchup, but just don't have the time to give it a proper go...to many things to build!!  Your welcome. Dave |
|
Roger
Junior Member
 
Posts: 59
|
Post by Roger on Apr 18, 2008 21:26:28 GMT
Now there is a true blue optimist ;D I just love that phrase they come together, aided of course by Determine and HangRanks up there with that famous trio Just, Quick and Easy   |
|
|
|
Post by lemonjeff on Sept 11, 2008 18:03:45 GMT
I'm back on this project after a break, a couple questions. The sliding doors are approx 2230mm x 560mm and will be panelled, 2 long panels top & bottom and a small one in the centre.
What's the minimum width for the rails and stiles using 22mm MRMDF?
What runners for sock drawers?
Jeff
|
|